These 10 hottest Chalk Couture techniques can take your projects to the next level! Starting out with Chalk Couture can be as easy as what is referred to as a “one and done” project. Use one color paste on a stencil design, and you can create a great project in minutes. This makes for an awesome and easy project, but sometimes you want a little bit more… Maybe you are ready for something more complicated that will test your skills or you just want to jazz things up for a feature piece on your gallery wall! That’s where experimenting comes in and you can use these 10 hottest Chalk Couture techniques to inspire you!
The beauty of creativity is that since it’s yours, it’s good enough! There are no rules! There is no right or wrong! There’s so much freedom in trying things out to see if you like them. You can stretch your wings and your imagination! Take some risks and do something radical and different! Your craft room is a great place to try out those ideas you may think are crazy! Go on! Give it a try! You may be surprised at how much you like it! So why not shake things up a bit and branch out? You may find a new medium you really love to work with, and there’s no downside to that!
The beauty of creativity is that since it’s yours, it’s good enough!
~Luana
10 Hottest Chalk Couture Techniques
Learning is fun, and since I’ve been experimenting in my craft room, I took the liberty of rounding up the 10 hottest Chalk Couture techniques to try. When you need some me time and your craft supplies are calling, take a look through this list to see what might get your juices flowing!
- Chalk & Lift – use this technique for projects with multiple colors or intricate details. Having your paste dry on top of your silk screen transfer before you are done is the worst! The Chalk & Lift technique is a way to chalk your design in sections so that you can take a little more time with the details and not have to worry about your paste drying on you. Basically, you chalk a portion of your design, lift the transfer just from that chalked section, and let that portion dry before moving on. Get all the detailed steps in the Chalk & Lift blog post.
- Layering stencils – Whether a stencil is made to be done in layers or you use your creativity to mix things up, layering stencils is a great way to create something unique. If you have a stencil that is created to layer, you will cut apart the stencil and use the registration marks to help you line up the layers. It’s also fun to layer individual stencils for a design that is all your own. A great way to layer stencils is to use a pattern as your first layer, and then chalk words or an image as your second layer. For examples and how-to information, check out the blog post for Layering Stencils.
- Watercolor – watercolor brings back so many memories, but let’s give it an upgrade! There are two ways to watercolor with Chalk Couture paste. You can fill in a design by watercolor painting it or watercolor your background and chalk over that! The Watercolor with Chalk Couture blog post will give you all the details on how to use both of these fun and versatile techniques!
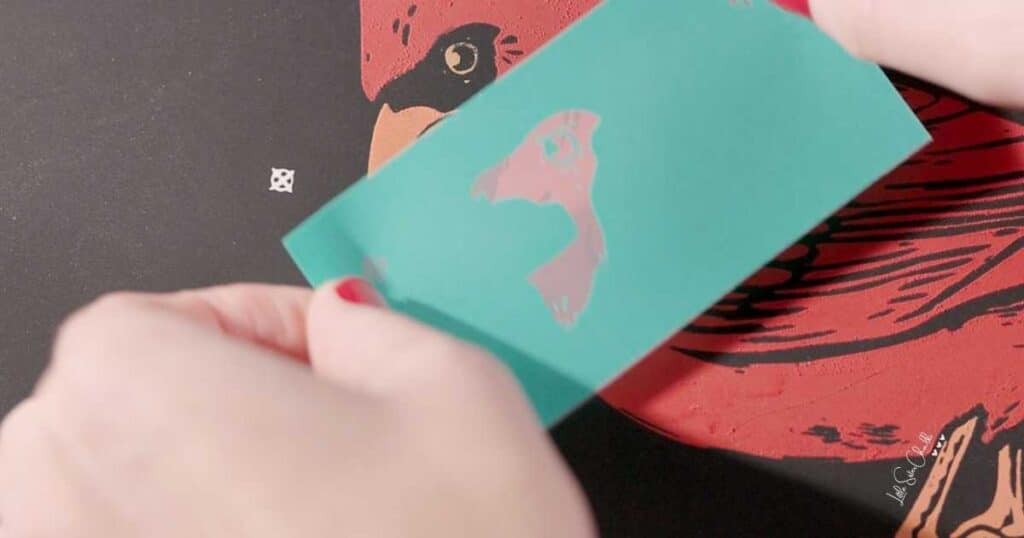
- Mirror image – you can use this technique to get a mirror image of your design which is useful if you want to chalk a flipped image of your design. This technique works great when you want a pair of something facing each other like a pair of deer or a pair of birds. The Mirror Image Technique blog post will explain exactly how to do this in case you ever find yourself wanting to flip your stencils!
- Shadow Effect – this can really make a design pop! It’s a pretty easy technique, especially when it’s a challenge to line up your stencil perfectly if you need to! Shadowing works with words or images. Check out the Shadow Effect Technique blog post to see exactly how to use this technique!
- Ombre – with the popularity of the ombre trend being used from hair to furniture over the last few years, this technique has been in the limelight! It’s a fun technique that lets you blend 2 to 3 colors and get your fingers dirty! Check out how to do this technique in the Ombre Technique blog post.
- Marbling – this is another technique that lets you get your fingers dirty! But instead of blending the colors in subtle shifts, you put some paste colors down and blend with abandon! This creates a very pretty look and is so fun to do! You can marble just about anything, but leaves and trees lend themselves beautifully to this technique. There are a few ways to use marbling, and you can learn more about them in the Marbling Technique blog post!
- Wood burning – this is a fascinating process that may be a little intimidating! This technique uses torch paste instead of chalk paste. You can make your own torch paste or purchase it. It does not ruin your stencil and works great on unfinished wood projects. It definitely makes a statement and gives your designs a very different look! Check out the Wood Burning Technique blog post for how to create with this technique!
- Etching – etching is another really fun process that may be a little intimidating. Basically, you etch a design into glass with etching cream using a Chalk Couture stencil. It’s really awesome that our stencils are so versatile and stand up to these different techniques! For some etching examples, see the Etching Technique post!
- Faux etching – using Shimmer Frost Chalkology Paste on glass gives the effect of etching with the versatility of chalk paste! Get the etched look but wash it off and chalk your glass again with a different design whenever you want to! Check out the Faux Etching blog post for more information.
Happy accidents or not so much?
Experimenting with new techniques is fun even if things don’t always turn out how you expected. Sometimes those little oops are “happy accidents”, but sometimes they’re just really beyond saving! That’s why Chalk Couture reusable surfaces are great for experimenting and practicing! If you truly don’t like what you made, you can wash it off with water and start again!
Sometimes a technique takes a time or two to get the feel for it, and reusable surfaces are a lifesaver in those instances! You can practice as many times as you want to or need to before you use a technique on something more permanent! See the Chalk Couture Surface Guide for more details on reusable surfaces.
Sometimes a technique takes a time or two to get the feel for it, and reusable surfaces are a lifesaver in those instances!
~Luana
Learn from others
Being part of a creative community is a great way to learn from others and see what they are doing! Finding inspiration in what other crafters are doing is the best part of a creative community! Fellow crafters can spark your creativity and give you confidence to try new things! Their ideas may trigger a brand new way to do something or give you inspiration that you can take in a whole new direction!
Come join our monthly zoom craft nights! Make new friends and get some new ideas! My fellow crafters share ideas freely and are the best team of cheerleaders around! Head on over to the Connect with Craft Lovers page for more information on how to join us.
I hope you are intrigued by at least some of these 10 hottest Chalk Couture techniques and give them a try! I’d love to feature you in our creative community, so share photos of those great projects with me!
I can’t wait to see what you create!
Luana