When you get a Chalk Couture stencil in your hand, you might be surprised by it! If you’re like me, the word stencil conjures up a plastic template with a cutout design that you used for making arts and crafts as a kid.
While the Chalk Couture stencil is used for making arts and crafts, it provides a much different experience and results in a much more adult and high-end look! This Chalk Couture Stencil Guide will provide details about stencils, tips for using them, tips for choosing them, and how to store them.
Chalk Couture stencils come in a variety of sizes and in different themes or categories. You will find designs for every day decorating, holidays, sassy sayings, kitchen and bath designs and so much more.
Chalk Couture stencils are also very versatile making it very easy to create a unique design. You can mix and match stencils, use them to create coordinating decor, or cut them apart and use individual elements of a design. You will also find patterns, monograms, and accents like frames and florals.
Chalk Couture Stencil Guide
What you’ll learn:
Stencil Basics
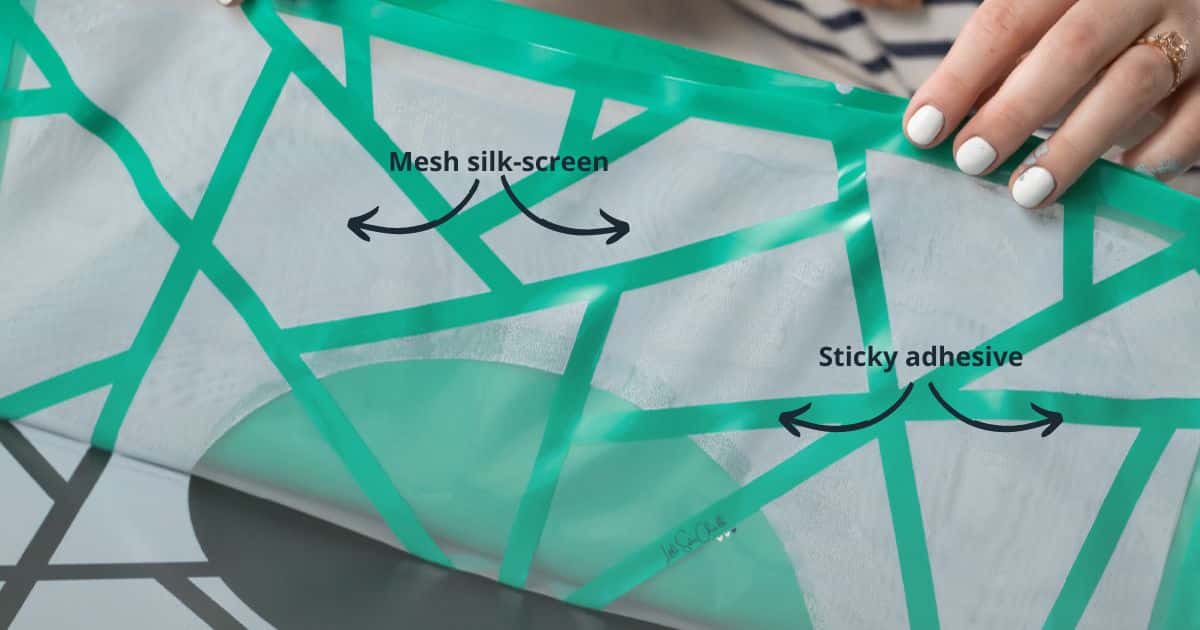
- Chalk Couture refers to stencils as “transfers”.
- They have a mesh silk-screen where the design will appear after you apply the chalk paste.
- They have a sticky adhesive back that helps them adhere to your surface for easy chalking.
- They are reusable up to an average of 10 – 12 times.
- You can clean them up with water or a Clorox (or cleaning) wipe. A board eraser (magic eraser) can be handy to clean up more pigmented colors like black and red.
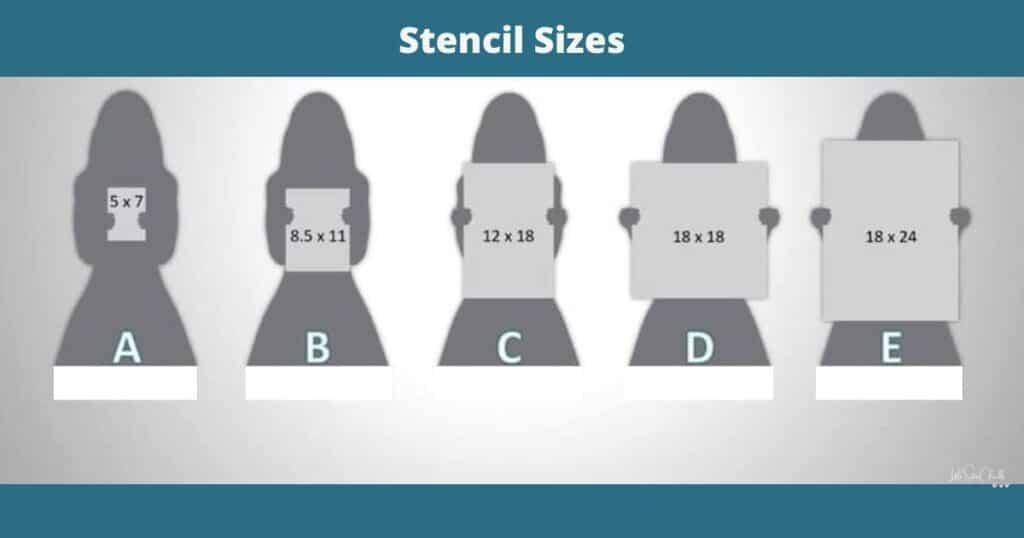
- They come in 5 sizes:
- A size = 5” x 7”
- B size = 8.5” x 11”
- C size = 12” x 18”
- D size = 18” x 18”
- E size = 18” x 24”
Tips for Using Stencils
- Your stencil should be sticky but not too sticky.
- Make sure to “fuzz” a stencil if it’s too sticky. This is especially important with brand new stencils. Fuzzing means that you are picking up a layer of lint to tone down the stickiness of the stencil. A fuzzing cloth works well for this but you can use a towel, a microfiber cloth or your shirt!
- To fuzz your stencil, remove it from its backing sheet and lay it sticky side down on your fuzzing cloth. Peel off and stick a few times to the cloth.
- Fuzzing is critical when you use your stencils on glass or other slick surfaces. Stencils stick particularly well to these surfaces increasing the chance for damage and stretching when removing your stencil.
- If the stencil loses its stickiness, wipe the sticky side with a Clorox (or cleaning) wipe and let it air dry with the sticky side up. A stencil that isn’t sticky enough may move around as you are chalking or allow the paste to bleed.
- If a stencil is too sticky, it will be hard to remove from your surface requiring you to pull too hard. This can stretch your stencil and cause damage
- Remove a stencil from your surface by pulling it up from top to bottom or from side to side. Do not pull it off diagonally, as that may cause stretching which will damage your stencil
- Clean stencils with cool water or a Clorox (or cleaning) wipe. Ensure the mesh silk-screen part of your stencil is clear of paste. A board eraser (magic eraser) can be handy to clean up more pigmented colors like black and red.
Tips for Choosing Stencils
This might be one of the hardest steps since there are so many stencils to choose from in a wide variety of sizes! Here are some things to consider:
- How big of a project do you want for your space? Chalk Couture has 5 sizes of stencils to choose from, but great choices when starting out are either the 5″ x 7″ (A Size) or the 8.5″ x 11″ (B Size) stencils.
- What room will you put this project in? There are stencils for every theme or vibe you want to give your space. You can get designs to use in any room of your house or specific designs for the kitchen, bath, and laundry.
- What will you style it with? Do you have a favorite piece of decor that you want to enhance with something new? Adding a little something new to your home decor freshens things up and makes great use of what you already own.
Tips for Storing Stencils
- After cleaning and once the stencil is dry, reattach the shiny side of the Transfer Backer Sheet to the sticky side of the stencil.
- Keep the smaller sized stencils in page protectors in a binder.
- Hang the stencils on hangers/pant hangers to store in a closet or on a rod.
- Store large sized stencils in the envelope they were shipped in.
- Store any size transfer flat in a drawer.
- Use an artist’s portfolio to store stencils. You can also separate them according to size.
I hope this Chalk Couture Stencil Guide gave you useful information about Chalk Couture stencils and lots of great tips for using them. If you are putting together your shopping list, head back to the Ultimate Guide for Chalk Couture Beginners or jump over to the Chalk Couture Surface Guide to find out about what’s available to chalk on.
I can’t wait to see what you create!
Luana